

Hay friends there are many file hosting sites in internet. Even we also use some of that file hosting sites to upload our files and then add that sharing link in our blog or websites or we share that link to our friends. But the main problem is that many of that file hosting site, some time they will delete your file for some reason.
So, I highly recommend you to use Google Drive for file hosting purpose, because it provides their users 15 Gb of free spaces for uploading files. But some cases the other file hosting sites delete our videos for some reasons.
But if you upload your videos in Google Drive, then your files will not be deleted. Here is the process how to upload files in Google Drive. You can upload any types of file in Google Drive. And one more thing is that the download process will done done directly. But in other file hosting site they will redirect you to many of the add pages, that is so much harassing. Do you know they will get paid for this.
So, don't take any extra headache, just use your own google drive for file hosting. I am telling you the process, just follow the bellow steps.
How to use Google Drive for file hosting:
Step 1: Firstly go to Google Drive > Create > Folder and name the folder such as Downloads

Step 2: Now open that folder "Downloads" which you have created in first step. After that Click on Upload Button and then click on Files button.
.
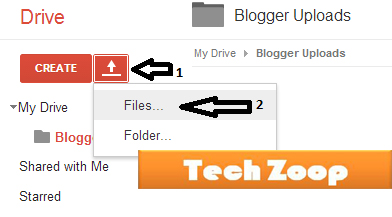
Step 3: Now browse the file, which you want to upload or drag the file from your computer's folder and drop into Google drive.
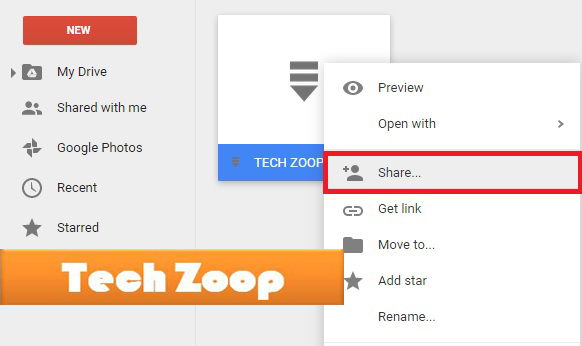
Step 4: After compleate the uploading process right click on the file and click on Share option.
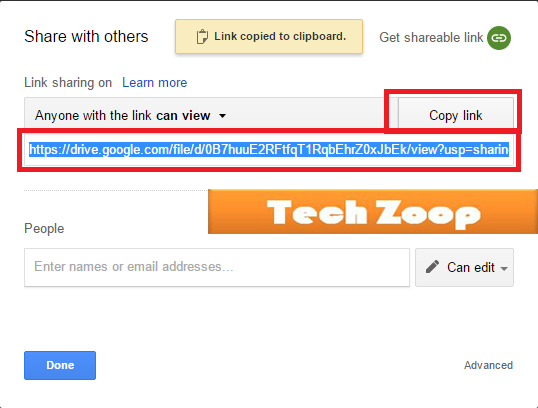
Step 5: Now another window will open with a link. You just simply copy the link or you can click on Copy Link button then click on Done button. Now paste the link in a notepad.
Step 6: Now copy the bellow link and paste it on the opened notepad.
https://docs.google.com/uc?export=download&id=Your_File_ID
Step 7: Now copy Your_File_ID and replace it with Your_File_ID in the second link in the opened notepad.
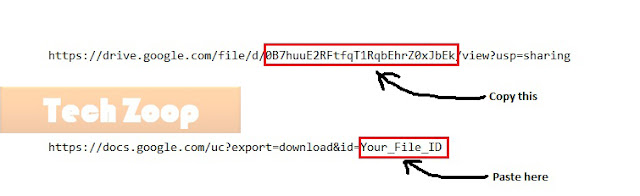
Step 8: After replacing, your downloading link looks like the bellow link,
https://docs.google.com/uc?export=download&id=0B7huuE2RFtfqT1RqbEhrZ0xJbEk
Step 9: Now you can add that link to your website, blog or you can share that link with your friends.
I think this tick will help you the most. If you will face any problem during activation of this protection then feel free to ask me. Now It's your turn to share this post with your friends and write your reviews in comment box. Feel free to follow us by Email to get our updates and upcoming amazing tutorials direct to your mail id...
0 comments:
Post a Comment